Thursday, 24 June 2021

Tuesday, 24 December 2019
Write the short note 🔥 Firewall?
A Firewall software used to maintain the security of private network.firewall are hardware and software combination that are built using routers server and verify of software.
Monday, 11 June 2018
Live: PM Narendra Modi Ministry Expansion 19 New Minister Take Oath टीम मोदी में 19 नए चेहरे: जावड़ेकर हुए प्रमोट, 5 मंत्रियों की हुई छुट्टी |

नई दिल्ली.नरेंद्र मोदी ने मंगलवार को मंत्रिमंडल में 19 नए
राज्य मंत्रियों को शामिल किया। प्रकाश जावड़ेकर को राज्यमंत्री से प्रमोट
कर कैबिनेट मंत्री बना दिया गया। हालांकि, 75 साल से ऊपर के नेताओं को
मंत्री नहीं बनाया गया। शपथ ग्रहण के दौरान तब अजीब स्थिति पैदा हुई जब
महाराष्ट्र के नेता और आरपीआई चीफ रामदास अठावले शपथ अपना नाम पढ़ना ही भूल
गए। प्रेसिडेंट ने उन्हें तीन बार टोका। दो बार खुद लाइनें पढ़ीं। मोदी की
नई टीम में 35 साल की अनुप्रिया पटेल अब सबसे युवा मंत्री हैं। वे अपना
दल की सांसद हैं। इस फेरबदल के तहत पांच मंत्रियों निहालचंद, रामशंकर
कठेरिया, सांवरलाल जाट, मनसुखभाई डी. वासवा अौर एमके. कुंदरिया से इस्तीफे
लिए गए हैं। पढ़ें 19 नए राज्य मंत्रियों की पूरी लिस्ट...
राजस्थान से 4 चेहरे
1. अर्जुन राम मेघवाल :बीकानेर से सांसद हैं। आईएएस भी रह चुके हैं। साइकिल से संसद जाने के लिए चर्चित हैं।
2. सीआर चौधरी :नागौर से सांसद हैं। मेवाड़ यूनिवर्सिटी में वाइस चांसलर रह चुके हैं। राजस्थान एडमिनिस्ट्रेटिव सर्विस में अफसर रह चुके हैं।
3. पीपी चौधरी :पाली से सांसद हैं। सुप्रीम कोर्ट के वकील हैं। 11 हजार से ज्यादा केस लड़ चुके हैं।
2. सीआर चौधरी :नागौर से सांसद हैं। मेवाड़ यूनिवर्सिटी में वाइस चांसलर रह चुके हैं। राजस्थान एडमिनिस्ट्रेटिव सर्विस में अफसर रह चुके हैं।
3. पीपी चौधरी :पाली से सांसद हैं। सुप्रीम कोर्ट के वकील हैं। 11 हजार से ज्यादा केस लड़ चुके हैं।
4. विजय गोयल :राजस्थान से राज्यसभा सदस्य हैं। हालांकि, उन्हें दिल्ली का नेता ज्यादा माना जाता है। दिल्ली बीजेपी के प्रेसिडेंट रह चुके हैं।
यूपी से 3 नाम
5. अनुप्रिया पटेल :एनडीए के सहयोगी दल अपना दल की नेता हैं। मिर्जापुर से सांसद हैं। अब टीम मोदी में सबसे युवा मिनिस्टर।
5. कृष्णा राज :शाहजहांपुर से सांसद हैं। दलित चेहरा हैं।
7. महेंद्रनाथ पांडे :चंदौली से सांसद हैं। पहली बार लोकसभा के लिए चुने गए हैं।
5. कृष्णा राज :शाहजहांपुर से सांसद हैं। दलित चेहरा हैं।
7. महेंद्रनाथ पांडे :चंदौली से सांसद हैं। पहली बार लोकसभा के लिए चुने गए हैं।
उत्तराखंड से एक को जगह
8. अजय टमटा :दलित नेता हैं। अलमोड़ा से सांसद हैं।
एमपी से
9. अनिल माधव दवे :एमपी के नेता हैं। संगठन से जुड़े हैं। राज्यसभा सदस्य हैं।
10. फग्गन सिंह कुलस्ते :मंडला से सांसद हैं। 2008 में कैश फॉर वोट में नाम आया था। इसके बाद उन्हें जेल भी जाना पड़ा था।
11. एमजे अकबर :राज्यसभा सदस्य हैं। पत्रकार रहे हैं। उन्हें विदेश राज्यमंत्री बनाया गया है।
10. फग्गन सिंह कुलस्ते :मंडला से सांसद हैं। 2008 में कैश फॉर वोट में नाम आया था। इसके बाद उन्हें जेल भी जाना पड़ा था।
11. एमजे अकबर :राज्यसभा सदस्य हैं। पत्रकार रहे हैं। उन्हें विदेश राज्यमंत्री बनाया गया है।
महाराष्ट्र
12. सुभाष भामरे :धुले से बीजेपी सांसद हैं। देश के बड़े कैंसर सर्जन हैं। टाटा मेमोरियल हॉस्पिटल में रहे हैं।
13. रामदास अठावले :एनडीए के सहयोगी दल आरपीआई के चीफ हैं। महाराष्ट्र के बड़े दलित नेता।
गुजरात
14. जसवंतसिंह भाभोर :दाहोद से सांसद हैं।
15. मनसुख मनदाविया :राज्यसभा मेंबर हैं।
16. पुरुषोत्तम रूपाला :मंत्री रह चुके हैं। मोदी के करीबी बताए जाते हैं।
15. मनसुख मनदाविया :राज्यसभा मेंबर हैं।
16. पुरुषोत्तम रूपाला :मंत्री रह चुके हैं। मोदी के करीबी बताए जाते हैं।
असम
17. राजेश गोहैन :नागांव से बीजेपी सांसद।
कर्नाटक
18. राजेश जिगजिगानी:बीजापुर से सांसद हैं। म्यूजिशियन और इंडस्ट्रियलिस्ट हैं। पांच बार सांसद और तीन बार विधायक रह चुके हैं।
बंगाल
19. एसएस अहलूवालिया :दार्जिलिंग से सांसद हैं। लंबे वक्त तक राज्यसभा में बीजेपी के उपनेता रहे हैं।
ये प्रमोट हुए
- प्रकाश जावड़ेकर :एन्वायरन्मेंट मिनिस्टर हैं। स्टेट मिनिस्टर इंडिपेंडेंट चार्ज थे। इन्हें कैबिनेट दर्जा मिला है।
20 महीने बाद फेरबदल
- मई 2014 में सरकार बनने के बाद पिछला और इकलौता फेरबदल नवंबर 2014 में हुआ था।
- इस बदलाव से पहले मोदी ने कहा कि इसे फेरबदल नहीं, विस्तार कहिए।
- शिवसेना कोटे से किसी को मंत्री नहीं बनाया गया।
इनकी हुई छुट्टी
1. एमके कुंदरिया -कृषि राज्यमंत्री थे।
2. निहालचंद -रसायन मंत्री रहे। श्रीगंगानगर से सांसद निहालचंद एक रेप केस में नाम आने के बाद से विपक्ष उन पर सवाल उठाता रहा है।
3. सांवरलाल जाट -जल संसाधन राज्यमंत्री थे।
4. मनसुख वसावा -आदिवासी मामलों के राज्यमंत्री थे।
5. रामशंकर कठेरिया -मानव संसाधन राज्यमंत्री रहे।
शिवसेना नाराज क्यों हुई?
- कहा जा रहा था कि फेरबदल में शिवसेना के अनिल देसाई को मंत्री बनाया जा सकता है। लेकिन ऐसा हुआ नहीं।
- सोमवार को शिवसेना सुप्रीमो उद्धव ठाकरे ने कहा था कि उनसे कैबिनेट फेरबदल पर कोई बातचीत नहीं की गई।
- उद्धव ने कहा था- "शिवसेना भीख नहीं, अपना हक मांग रही है। हमें आधा नहीं, बल्कि अपना पूरा हक चाहिए।"
-
बता दें कि मोदी सरकार बनने वक्त भी काफी ड्रामा हुआ था। 18 सांसदों वाली
शिवसेना की डिमांड ज्यादा थी। लेकिन सिर्फ अनंत गीते को मंत्री बनाया गया
था।
- नाराजगी ऐसी थी कि तीन दिन बाद अनंत गीते ने काम संभाला था।
अफ्रीका दौरे से पहले फेरबदल
- मोदी 7 जुलाई को चार अफ्रीकी देशों की विजिट पर रवाना हो रहे हैं। इसके पहले वो कैबिनेट में फेरबदल करना चाहते थे।
- बीजेपी प्रेसिडेंट अमित शाह से उन्होंने बीते 45 दिनों में कई बार इस मुद्दे पर चर्चा भी की थी। पिछले हफ्ते तो दोनों के बीच करीब चार घंटे बातचीत हुई थी।
- बीजेपी प्रेसिडेंट अमित शाह से उन्होंने बीते 45 दिनों में कई बार इस मुद्दे पर चर्चा भी की थी। पिछले हफ्ते तो दोनों के बीच करीब चार घंटे बातचीत हुई थी।


Tuesday, 5 July 2016
मोदी मंत्रिमंडल में बड़े बदलाव: स्मृति ईरानी की HRD से छुट्टी, जानें किसे मिली क्या जिम्मेदारी |
नयी दिल्ली: प्रधानमंत्री नरेंद्र मोदी ने अपने मंत्रिमंडल में 19 नए मंत्रियों को शामिल करने के बाद विभागों में फेरबदल करके सबको चौंका दिया है. स्मृति ईरानी की जगह पर प्रकाश जावड़ेकर को मानव संसाधन विकास मंत्रालय का जिम्मा सौंपा गया है जबकि स्मृति ईरानी अब कपड़ा मंत्रालय का कार्यभार संभालेंगी. केंद्र की नरेंद्र मोदी सरकार के मंत्रिपरिषद विस्तार और फेरबदल के तहत मंगलवार रात स्मृति ईरानी को मानव संसाधन विकास जैसे अहम मंत्रालय से हटाकर कम अहमियत वाले कपडा मंत्रालय की जिम्मेदारी सौंप दी गई.
वहीं केंद्रीय वित्त मंत्री अरुण जेटली ने सूचना एवं प्रसारण मंत्रालय का अतिरिक्त प्रभार छोड दिया है. हैदराबाद में दलित छात्र रोहित वेमुला की खुदकुशी और जेएनयू विवाद जैसे वाकयों की वजह से ईरानी का लगभग दो साल का कार्यकाल विवादों में रहा है. बहरहाल, ईरानी को महत्वहीन समझा जाने वाला कपडा मंत्रालय दिए जाने से यह कयास भी लगाए जा रहे हैं कि कहीं ऐसा इसलिए तो नहीं किया गया कि वह 2017 में होने वाले उत्तर प्रदेश विधानसभा चुनाव में भाजपा के प्रचार का चेहरा बनाए जाने की स्थिति में वह प्रचार के लिए ज्यादा वक्त निकाल सकें. प्रधानमंत्री ने आज अपने मंत्रिपरिषद के विस्तार में 19 नए मंत्रियों को शामिल किया जिनमें भाजपा नेता एस एस आहलूवालिया, एम जे अकबर और विजय गोयल जैसे जानेमाने नाम शामिल हैं.
पर्यावरण राज्य मंत्री (स्वतंत्र प्रभार) प्रकाश जावडेकर को सरकार के इस दूसरे विस्तार में तरक्की देकर कैबिनेट रैंक के मंत्री के तौर पर शपथ दिलाई गई. अकबर को विदेश राज्य मंत्री बनाया गया है. विदेश मंत्रालय में वी के सिंह एक अन्य राज्य मंत्री हैं. शहरी विकास मंत्री एम वैंकैया नायडू को सूचना एवं प्रसारण मंत्रालय का अतिरिक्त प्रभार दिया गया है. हालांकि, उनसे संसदीय कार्य मंत्रालय की जिम्मेदारी वापस ले ली गई है. यह जिम्मेदारी अब रसायन एवं उवर्रक मंत्री अनंत कुमार संभालेंगे. मंत्रिपरिषद में हुए इस फेरबदल में डी वी सदानंद गौडा से कानून एवं न्याय मंत्रालय वापस ले लिया गया. कानून एवं न्याय मंत्रालय का अतिरिक्त प्रभार अब रविशंकर प्रसाद संभालेंगे. गौडा को सांख्यिकी एवं कार्यक्रम क्रियान्वयन मंत्रालय आवंटित किया गया है. जयंत सिन्हा को वित्त राज्य मंत्री के पद से हटाकर नागरिक उड्डयन राज्य मंत्री बनाया गया है. इस पद पर अब तक महेश शर्मा थे. शर्मा अब सिर्फ संस्कृति एवं पर्यटन मंत्रालय की जिम्मेदारी संभालेंगे.
मंत्रिपरिषद में हुए इस फेरबदल में पांच राज्य मंत्रियों को बाहर का रास्ता दिखाया गया. पांच मंत्रियों को हटाने और विस्तार के बाद अब मोदी मंत्रिपरिषद में 78 मंत्री हो गए हैं. कैबिनेट मंत्रियों में चौधरी वीरेंद्र सिंह को ग्रामीण विकास, पंचायती राज और पेयजल एवं स्वच्छता मंत्रालय से हटाकर इस्पात मंत्रालय की जिम्मेदारी दी गई है. ग्रामीण विकास, पंचायती राज और पेयजल एवं स्वच्छता मंत्रालय की जिम्मेदारी अब नरेंद्र सिंह तोमर को दी गई है. वह पहले खदान एवं इस्पात मंत्री थे. अन्य कैबिनेट मंत्रियों और राज्य मंत्रियों के प्रभार में कोई बदलाव नहीं किया गया. बिजली, कोयला एवं अक्षय उर्जा राज्य मंत्री (स्वतंत्र प्रभार) को खदान मंत्रालय का अतिरिक्त प्रभार दिया गया है.
रेल राज्य मंत्री मनोज सिन्हा को संचार राज्य मंत्री (स्वतंत्र प्रभार) की जिम्मेदारी दी गई है जबकि संतोष कुमार गंगवार को जयंत सिन्हा की जगह वित्त मंत्रालय में भेजा गया है. इससे पहले, गंगवार कपडा राज्य मंत्री (स्वतंत्र प्रभार) थे. अर्जुन राम मेघवाल वित्त मंत्रालय में दूसरे राज्य मंत्री होंगे. पर्यावरण राज्य मंत्री (स्वतंत्र प्रभार) की जिम्मेदारी संभाल रहे जावडेकर एकमात्र ऐसे मंत्री रहे जिन्हें कैबिनेट रैंक में तरक्की दी गई, जबकि सभी नए मंत्रियों को राज्य मंत्री के तौर पर शपथ दिलाई गई. इससे पहले, ऐसी अटकलें थीं कि गोयल और वाणिज्य राज्य मंत्री (स्वतंत्र प्रभार) निर्मला सीतारमण को कैबिनेट रैंक में तरक्की दी जाएगी. नए मंत्रियों में विजय गोयल को युवा मामलों एवं खेल मंत्रालय में राज्य मंत्री :स्वतंत्र प्रभार: बनाया गया है. असम के मुख्यमंत्री बनने से पहले इस पद पर सर्वानंद सोनोवाल काबिज थे. अनिल माधव दवे को पर्यावरण मंत्रालय में राज्य मंत्री (स्वतंत्र प्रभार) बनाया गया है. भाजपा की सहयोगी पार्टी अपना दल की नेता अनुप्रिया पटेल को स्वास्थ्य एवं परिवार कल्याण मंत्रालय में राज्य मंत्री (स्वतंत्र प्रभार) बनाया गया है जबकि डॉ. एस आर भामरे को रक्षा राज्य मंत्री बनाया गया है.
आहलूवालिया को कृषि एवं किसान कल्याण मंत्रालय और संसदीय कार्य मंत्रालय में राज्य मंत्री बनाया गया है. अजय टम्टा (उत्तराखंड), अर्जुन राम मेघवाल (राजस्थान), कृष्णा राज (उत्तर प्रदेश), रामदास अठावले (महाराष्ट्र), रमेश सी जीगाजिनगी (कर्नाटक) उन दलित मंत्रियों में शामिल हैं जिन्हें राष्ट्रपति भवन में आज आयोजित एक कार्यक्रम में राष्ट्रपति प्रणब मुखर्जी ने पद एवं गोपनीयता की शपथ दिलाई. शपथ ग्रहण कार्यक्रम में उपराष्ट्रपति हामिद अंसारी, प्रधानमंत्री मोदी और उनके मंत्रिपरिषद के सहकर्मी, भाजपा अध्यक्ष अमित शाह और सहयोगी पार्टियों के नेता मौजूद थे. कांग्रेस का कोई भी नेता इस मौके पर मौजूद नहीं था. जिन अन्य चेहरों को मंत्री बनाया गया उनमें पी पी चौधरी, सी आर चौधरी (राजस्थान), ए एम दवे, फग्गन सिंह कुलस्ते (मध्य प्रदेश), महेंद्र नाथ पांडेय उत्तर प्रदेश) पुरुषोत्तम रुपाला, जे भाभोर और मनसुखभाई मंडाविया (गुजरात), राजेन गोहाईं (असम) और एस आर भामरे (महाराष्ट्र) शामिल हैं. राष्ट्रपति भवन की ओर से जारी एक विज्ञप्ति में कहा गया कि राष्ट्रपति ने सांवर लाल जाट (जल संसाधन), मोहनभाई कल्याणजीभाई कुंदरिया (कृषि), निहाल चंद (पंचायती राज), मनसुखभाई धानजीभाई वासव (जनजातीय मामले) और राम शंकर कठेरिया (एचआरडी) का इस्तीफा स्वीकार कर लिया है.
Friday, 1 July 2016
PHP Operator Precedence
Here's a list of the operators you've met so far, and the order of precedence.
This can make a difference, as we saw during the mathematical operators. Don't
worry about these too much, unless you're convinced that your math or logical
is correct. In which case, you might have to consult the following:
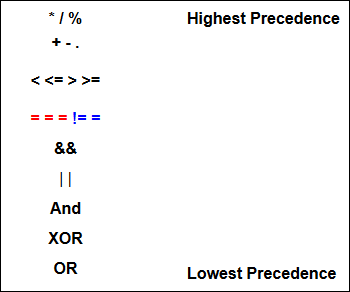 The only operators you haven't yet met on the list above are the =
= = and != = operators.
The only operators you haven't yet met on the list above are the =
= = and != = operators.
In recent editions of PHP, two new operators have been introduced: the triple equals sign ( = = =) and an exclamation, double equals ( != =). These are used to test if one value has the same as another AND are of the same type. An example would be:
Ok, if all of that has given you a headache, let's move on to some practical work. In the next section, we'll take a look at HTML forms, and how to get data from them. This is so that we can do other things besides printing to the screen.
In recent editions of PHP, two new operators have been introduced: the triple equals sign ( = = =) and an exclamation, double equals ( != =). These are used to test if one value has the same as another AND are of the same type. An example would be:
$number = 3;
$text = 'three';
$text = 'three';
if ($number === $text) {
print("Same");
}
else {
else {
print("Not the same");
}
So this asks, "Do the variables match exactly?" Since one is text
and the other is a number, the answer is "no", or false. We won't
be using these operators much, if at all!Ok, if all of that has given you a headache, let's move on to some practical work. In the next section, we'll take a look at HTML forms, and how to get data from them. This is so that we can do other things besides printing to the screen.
PHP Logical Operators
As well as the PHP comparison operators you saw earlier, there's also something
called Logical Operators. You typically use these when you want to test more
than one condition at a time. For example, you could check to see whether the
username and password are correct from the same If Statement. Here's the table
of these Operands.
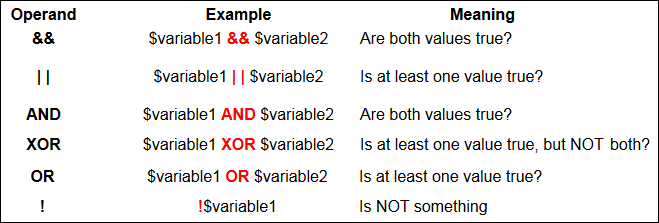 The new Operands are rather strange, if you're meeting them for the first time.
A couple of them even do the same thing! They are very useful, though, so here's
a closer look.
The new Operands are rather strange, if you're meeting them for the first time.
A couple of them even do the same thing! They are very useful, though, so here's
a closer look.
The && Operator
The && symbols mean AND. Use this if you need both values to be true, as in our username and password test. After all, you don't want to let people in if they just get the username right but not the password! Here's an example:
The | | Operator
The two straight lines mean OR. Use this symbol when you only need one of your conditions to be true. For example, suppose you want to grant a discount to people if they have spent more than 100 pounds OR they have a special key. Else they don't get any discount. You'd then code like this:
AND and OR
These are the same as the first two! AND is the same as && and OR is the same as ||. There is a subtle difference, but as a beginner, you can simply replace this:
The difference, incidentally, is to do with Operator Precedence. We touched on this when we discussed variables, earlier. Logical Operators have a pecking order, as well. The full table is coming soon!
XOR
You probably won't need this one too much. But it's used when you want to test if one value of two is true but NOT both. If both values are the same, then PHP sees the expression as false. If they are both different, then the value is true. Suppose you had to pick a winner between two contestants. Only one of them can win. It's an XOR situation!
The ! Operator
This is known as the NOT operator. You use it test whether something is NOT something else. You can also use it to reverse the value of a true or false value. For example, you want to reset a variable to true, if it's been set to false, and vice versa. Here's some code to try:
The && Operator
The && symbols mean AND. Use this if you need both values to be true, as in our username and password test. After all, you don't want to let people in if they just get the username right but not the password! Here's an example:
$username ='user';
$password ='password';
$password ='password';
if ($username =='user' && $password =='password')
{
print("Welcome back!");
}
else {
else {
print("Invalid Login Detected");
}
The if statement is set up the same, but notice that now two conditions are
being tested:
$username =='user' && $password =='password
This says, "If username is correct AND the password is ok, too, then let
them in". Both conditions need to go between the round brackets of your
if statement.The | | Operator
The two straight lines mean OR. Use this symbol when you only need one of your conditions to be true. For example, suppose you want to grant a discount to people if they have spent more than 100 pounds OR they have a special key. Else they don't get any discount. You'd then code like this:
$total_spent =100;
$special_key ='SK12345';
$special_key ='SK12345';
if ($total_spent ==100 | | $special_key =='SK12345') {
print("Discount Granted!");
}
else {
else {
print("No discount for you!");
}
This time we're testing two conditions and only need ONE of them to be true.
If either one of them is true, then the code gets executed. If they are both
false, then PHP will move on.AND and OR
These are the same as the first two! AND is the same as && and OR is the same as ||. There is a subtle difference, but as a beginner, you can simply replace this:
$username =='user' && $password =='password
With this
$username =='user' AND $password =='password
And this:
$total_spent ==100 | | $special_key =='SK12345'
With this:
$total_spent ==100 OR $special_key =='SK12345'
It's up to you which you use. AND is a lot easier to read than &&.
OR is a lot easier to read than ||.The difference, incidentally, is to do with Operator Precedence. We touched on this when we discussed variables, earlier. Logical Operators have a pecking order, as well. The full table is coming soon!
XOR
You probably won't need this one too much. But it's used when you want to test if one value of two is true but NOT both. If both values are the same, then PHP sees the expression as false. If they are both different, then the value is true. Suppose you had to pick a winner between two contestants. Only one of them can win. It's an XOR situation!
$contestant_one = true;
$contestant_two = true;
$contestant_two = true;
if ($contestant_one XOR $contestant_two) {
print("Only one winner!");
}
else {
else {
print("Both can't win!");
}
See if you can guess which of the two will print out, before running the script.The ! Operator
This is known as the NOT operator. You use it test whether something is NOT something else. You can also use it to reverse the value of a true or false value. For example, you want to reset a variable to true, if it's been set to false, and vice versa. Here's some code to try:
$test_value = false;
if ($test_value == false) {
print(!$test_value);
}
The code above will print out the number 1! (You'll see why when we tackle
Boolean values below.) What we're saying here is, "If $test_value is false
then set it to what it's NOT." What it's NOT is true, so it will now get
this value. A bit confused? It's a tricky one, but it can come in handy!PHP Switch Statements
In some earlier code, we tested a single variable
that came from a drop-down list. A different picture was displayed on screen,
depending on the value inside of the variable. A long list of if and
else … if statements were used. A better option, if you have only
one variable to test, is to use something called a switch statement. To see
how switch statements work, study the following code:
To test a single variable with a Switch Statement, the following syntax is used:
switch ($variable_name) {
You Start with the word 'Switch' then a pair of round brackets. Inside of the round brackets, you type the name of the variable you want to check. After the round brackets, you need a left curly bracket.
case 'What_you_want_to_check_for':
The word 'case' is used before each value you want to check for. In our code, a list of values was coming from a drop-down list. These value were: church and kitten, among others. These are the values we need after the word 'case'. After the the text or variable you want to check for, a colon is needed ( : ).
//code here
After the semi colon on the 'case' line, you type the code you want to execute. Needless to say, you'll get an error if you miss out any semi-colons at the end of your lines of code!
break;
You need to tell PHP to "Break out" of the switch statement. If you don't, PHP will simply drop down to the next case and check that. Use the word 'break' to get out of the Switch statement.
To see the Switch statement in action, there is a file called selectPicture2.php amongst the ones you downloaded (Go here, if you haven't yet downloaded the files for this course). It’s in the scripts folder. Try it out, if you like!
If you look at the last few lines of the Switch Statement in this file, you'll see something else you can add to your own code:
<?php
$picture ='church';
switch ($picture) {
case 'kitten':
print('Kitten Picture');
break;
break;
case 'church':
print('Church Picture');
break;
break;
}
?>
In the code above, we place the direct text "church" into the variable
called $picture. It's this direct text that we want to check. We want
to know what is inside of the variable, so that we can display the correct picture.To test a single variable with a Switch Statement, the following syntax is used:
switch ($variable_name) {
case 'What_you_want_to_check_for':
//code here
break;
break;
}
It looks a bit complex, so we'll break it down.switch ($variable_name) {
You Start with the word 'Switch' then a pair of round brackets. Inside of the round brackets, you type the name of the variable you want to check. After the round brackets, you need a left curly bracket.
case 'What_you_want_to_check_for':
The word 'case' is used before each value you want to check for. In our code, a list of values was coming from a drop-down list. These value were: church and kitten, among others. These are the values we need after the word 'case'. After the the text or variable you want to check for, a colon is needed ( : ).
//code here
After the semi colon on the 'case' line, you type the code you want to execute. Needless to say, you'll get an error if you miss out any semi-colons at the end of your lines of code!
break;
You need to tell PHP to "Break out" of the switch statement. If you don't, PHP will simply drop down to the next case and check that. Use the word 'break' to get out of the Switch statement.
To see the Switch statement in action, there is a file called selectPicture2.php amongst the ones you downloaded (Go here, if you haven't yet downloaded the files for this course). It’s in the scripts folder. Try it out, if you like!
If you look at the last few lines of the Switch Statement in this file, you'll see something else you can add to your own code:
default:
print ("No Image Selected");
The default option is like the else from if … else. It's
used when there could be other, unknown, options. A sort of "catch all"
option.print ("No Image Selected");
Less Than or Equal To, Greater Than or Equal To
We can use the same code you created in the
previous section to illustrate "Less Than or Equal To" and "Greater
Than or Equal To". Change this line in your code:
$total_spent = 90;
to this:
$total_spent = 100;
Now run your code again. Did anything print?
The reason why nothing printed, and no errors occurred, is because we haven't written any condition logic to test for equality. We're only checking to see if the two variables are either Less Than ( < ) each other, or Greater Than ( > ) each other. We need to check if they are the same (as they now are).
Instead of adding yet another else if part, checking to see if the two totals are equal, we can use the operators <= (Less Than or Equal To) or >=(Greater Than or Equal To). Here's how. Change this line in your code:
else if($total_spent < $discount_total) {
to this:
else if($total_spent <= $discount_total) {
The only thing that's changed is the Less Than or Equal to symbol has
been used instead of just the Less Than sign.Now run your code again. Because we're now saying "If total spent is Less Than or equal to discount total, then execute the code." So the text gets printed to the screen.
Exercise
Suppose you want to apply the discount if 100 pounds or more has been spent. Change your code above to display the correct message. Use the >= symbol for this exercise.
Comparison Operators can take a little getting used, but are well worth the effort. If you're having a hard time with all these Operands, you'll be glad to hear that there's even more of them! Before we get to them, though, let's take a look at another logic technique you can use – the Switch Statement.
PHP Less Than, Greater Than
The Less Than ( < ) and Greater Than ( > ) symbols come in quite handy.
They are really useful in loops (which we'll deal with in another section),
and for testing numbers in general.
Suppose you wanted to test if someone has spent more than 100 pounds on your site. If they do, you want to give them a ten percent discount. The Less Than and Greater Than symbols can be used. Try this script. Open up your text editor, and type the following. Save your work, and try it out on your server.
The Less Than symbol can be used in the same way. Change your script to this (new lines are in bold):
There is a problem with scripts such as the ones above, however. In the next part, we'll take a look at the operators for Less Than or Equal To and Greater Than or Equal To.
Suppose you wanted to test if someone has spent more than 100 pounds on your site. If they do, you want to give them a ten percent discount. The Less Than and Greater Than symbols can be used. Try this script. Open up your text editor, and type the following. Save your work, and try it out on your server.
<?PHP
$total_spent = 110;
$discount_total = 100;
$discount_total = 100;
if ($total_spent > $discount_total) {
print("10 percent discount applies to this order!");
}
?>
By using the Greater Than symbol ( > ), we're saying "If the
total spent is greater than the discount total then execute some code."The Less Than symbol can be used in the same way. Change your script to this (new lines are in bold):
<?PHP
$total_spent = 90;
$discount_total = 100;
$discount_total = 100;
if ($total_spent > $discount_total) {
print("10 percent discount applies to this
order!");
}
else if($total_spent < $discount_total) {
else if($total_spent < $discount_total) {
print("Sorry – No discount!");
}
?>
In the else if part added above, we're checking to see if the total spent is
Less Than ( < )100 pounds. If
it is, then a new message is display. Notice that the $total_spent variable
has been reduced to 90.There is a problem with scripts such as the ones above, however. In the next part, we'll take a look at the operators for Less Than or Equal To and Greater Than or Equal To.
PHP Not Equal To
In the previous section, you saw what Comparison
Operators were. In this lessons, we'll explore the Comparison Operator for
Not Equal To: !=.
So open up your text editor, and add the following script:
In the next part, we'll have a look at how to use the Less Than ( < ) and Greater Than ( > ) operators.
So open up your text editor, and add the following script:
<?PHP
$correct_username = 'logmein';
$what_visitor_typed = 'logMEin';
$what_visitor_typed = 'logMEin';
if ($what_visitor_typed != $correct_username) {
print("You're not a valid user of this site!");
}
?>
Save your work and try it out. You should be able to guess what it does!
But the thing to note here is the new Comparison Operator. Instead of using
the double equals sign we’re now using an exclamation mark and a single
equals sign. The rest of the If Statement is exactly the same format as you
used earlier.
The things you’re trying to compare need to be different
before a value of true is returned by PHP. In the second variable ($what_visitor_typed),
the letters “ME” are in uppercase; in the first variable, they are
in lowercase. So the two are not the same. Because we used the NOT equal to
operator, the text will get printed. Change your script to this:
$correct_username = 'logmein';
$what_visitor_typed = 'logmein';
$what_visitor_typed = 'logmein';
if ($what_visitor_typed != $correct_username)
{
print("You're not a valid user of this site!");
}
else {
else {
print("Welcome back, friend!");
}
See if you can figure out what has changed. Before you run the script, what
will get printed out?In the next part, we'll have a look at how to use the Less Than ( < ) and Greater Than ( > ) operators.
PHP Comparison Operators
You saw in the last section how to test what is inside of a variable. You used
if, else … if, and else. You used the double equals sign (==) to test whether
the variable was the same thing as some direct text. The double equals sign
is known as a Comparison Operator. There a few more of these “operands”
to get used. Here’s a list. Take a look, and then we’ll see a few
examples of how to use them.
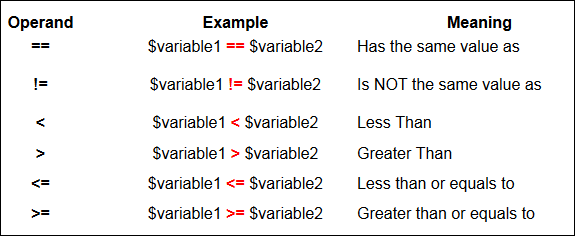 Here's some more information on the above Operands.
== (Has the same value as)
The double equals sign can mean “Has a value of” or "Has the same value as”. In the example below, the variable called $variable1 is being compared to the variable called $variable2
You can also test if one condition is NOT the same as another. In which case, you need the exclamation mark/equals sign combination ( != ). If you were testing for a genuine username, for example, you could say:
< (Less Than)
You'll want to test if one value is less than another. Use the left angle bracket for this ( < )
> (Greater Than)
You'll also want to test if one value is greater than another. Use the right angle bracket for this ( > )
<= (Less than or equals to)
For a little more precision, you can test to see if one variable is less than or equal to another. Use the left angle bracket followed by the equals sign ( <= )
>= (Greater than or equals to)
If you need to test if one variable is greater than or equal to another, use the right angle bracket followed by the equals sign ( >= )
== (Has the same value as)
The double equals sign can mean “Has a value of” or "Has the same value as”. In the example below, the variable called $variable1 is being compared to the variable called $variable2
if ($variable1 == $variable2) {
}
!= (Is NOT the same value as)You can also test if one condition is NOT the same as another. In which case, you need the exclamation mark/equals sign combination ( != ). If you were testing for a genuine username, for example, you could say:
if ($what_user_entered != $username) {
print("You're not a valid user of this site!");
}
The above code says, “If what the user entered is NOT the same as the
value in the variable called $username then print something out.< (Less Than)
You'll want to test if one value is less than another. Use the left angle bracket for this ( < )
> (Greater Than)
You'll also want to test if one value is greater than another. Use the right angle bracket for this ( > )
<= (Less than or equals to)
For a little more precision, you can test to see if one variable is less than or equal to another. Use the left angle bracket followed by the equals sign ( <= )
>= (Greater than or equals to)
If you need to test if one variable is greater than or equal to another, use the right angle bracket followed by the equals sign ( >= )
PHP if ... else if Statements
You can also add “else if” parts to the If Statements you've been
exploring in the previous sections. The syntax is
this:
To catch any other eventualities, we have an “else” part at the end. Notice that all parts (if, else if, and else) are neatly sectioned of with pairs of curly brackets:
As a nice example of if statements, there is a file called “selectPicture.php” in the files that you downloaded. It’s in the scripts folder. Copy this to your own www (root) folder. As long as you have all the images mentioned in the script, they should display. But examine the code for the script (ignore the HTML form tags for now). What it does is to display an image, based on what the user selected from a drop down list. If statements are being used to test what is inside of a single variable.
Don’t worry too much about the rest of the code: concentrate on the if statements. All we’re doing is testing what is inside of the variable called $picture. We’re then displaying the image that corresponds to the word held in the variable.
else if (another_condition_to_test) {
}
Change your code to this, to see how else if works:
<?PHP
$kitten_image = 1;
$church_image = 0;
$church_image = 0;
if ($kitten_image == 1) {
print ("<IMG SRC =images/kitten.jpg>");
}
else if ($church_image == 1) {
else if ($church_image == 1) {
print ("<IMG SRC =images/church.jpg>");
}
else {
else {
print ("No value of 1 detected");
}
?>
Here’s we’re just testing to see which of our variables holds a value
of 1. But notice the “else if” lines (and that there’s a space
between else and if):
else if ($church_image == 1) {
print ("<IMG SRC =images/church.jpg>");
}
What you’re saying is “If the previous if statement isn’t true,
then try this one.” PHP will then try to evaluate the new condition. If
it’s true (the $church_image variable holds a value of 1), then
the code between the new curly brackets gets executes. If it’s false (the
$church_image variable does NOT holds a value of 1), then the line of
code will be ignored, and PHP will move on.To catch any other eventualities, we have an “else” part at the end. Notice that all parts (if, else if, and else) are neatly sectioned of with pairs of curly brackets:
if ($kitten_image == 1) {
}
else if ($church_image == 1) {
}
else {
}
You can add as many else if parts as you like, one for each condition that
you want to test. But change your two variables from this:
$kitten_image = 1;
$church_image = 0;
to this:$church_image = 0;
$kitten_image = 0;
$church_image = 0;
Then run your code again. What do you expect to happen?$church_image = 0;
As a nice example of if statements, there is a file called “selectPicture.php” in the files that you downloaded. It’s in the scripts folder. Copy this to your own www (root) folder. As long as you have all the images mentioned in the script, they should display. But examine the code for the script (ignore the HTML form tags for now). What it does is to display an image, based on what the user selected from a drop down list. If statements are being used to test what is inside of a single variable.
Don’t worry too much about the rest of the code: concentrate on the if statements. All we’re doing is testing what is inside of the variable called $picture. We’re then displaying the image that corresponds to the word held in the variable.
if ... else Statements in PHP
Instead of using two if statements, as in the previous
lesson, we can use an if ... else statement. Like this:
The syntax for the if else statement is this:
<?PHP
$kitten_image = 0;
$church_image = 1;
$church_image = 1;
if ($kitten_image == 1) {
print ("<IMG SRC =images/kitten.jpg>");
}
else {
else {
print ("<IMG SRC =images/church.jpg>");
}
?>
Copy this new script, save your work, and try it out. You should find that
the church image displays in the browser. This time, an if … else
statement is being used. Let’s see how it works.The syntax for the if else statement is this:
if (condition_to_test) {
}
else {
else {
}
If you look at it closely, you’ll see that you have a normal If Statement
first, followed by an “else” part after it. Here’s the “else”
part:
else {
}
Again, the left and right curly brackets are used. In between the curly brackets,
you type the code you want to execute. In our code, we set up two variables:
$kitten_image = 0;
$church_image = 1;
The variable called $kitten_image has been assigned a value of 0, and
the variable called $church_image has been assigned a value of 1. The
first line of the if statement tests to see what is inside of the variable called
$kitten_image. It’s testing to see whether this variable has a value
of 1.$church_image = 1;
if ($kitten_image == 1) {
What we’re asking is: “Is it true that $kitten_image holds a value
of 1?” The variable $kitten_image holds a value of 0, so PHP sees this
as not true. Because a value of “not true” has been returned (false,
if you like), PHP ignores the line of code for the if statement. Instead, it
will execute the code for the “else” part. It doesn’t need to
do any testing – else means “when all other options have been exhausted,
run the code between the else curly brackets.“ For us, that was this:
else {
print ("<IMG SRC =images/church.jpg>");
}
So the church image gets displayed. Change your two variables from this:
$kitten_image = 0;
$church_image = 1;
To this:$church_image = 1;
$kitten_image = 1;
$church_image = 0;
Run your code again and watch what happens. You should see the kitten! But
can you work out why?$church_image = 0;
Some Practise with PHP If Statements
We can use an if statement to display our image, from the previous
section. If the user selected "church", then display the church
image. If the user selected "kitten", then display another image (the
kitten image, which is also in your images folder).
Here's some code:
When you run the script, the kitten image should display. Let's look at the code and see what's happening.
The first two lines just set up some variables:
What we want to say is:
The code we want to execute, though, is the print statement, so that our kitten image will display. This goes inside of the if statement:
But if your if statement only runs to one line, you can just do this:
To make use of the church image, here's some new code to try:
<?PHP
$kitten_image = 1;
$church_image = 0;
$church_image = 0;
if ($kitten_image == 1) {
print ("<IMG SRC =images/kitten.jpg>");
}
?>
Type that out, and save it as testImages.php. (Notice how there's no
HTML!) When you run the script, the kitten image should display. Let's look at the code and see what's happening.
The first two lines just set up some variables:
$kitten_image = 1;
$church_image = 0;
A value of 1 has been assigned to the variable called $kitten_image.
A value of 0 has been assigned to the variable called $church_image.
Then we have our if statement. Here it is without the print statement:$church_image = 0;
if ($kitten_image == 1) {
}
Notice how there's no semi-colon at the end of the first line - you don't need
one. After the word "if" we have a round bracket. Then comes our variable
name: $kitten_image. We want to test what's inside of this variable.
Specifically, we want to test if it has a value of 1. So we need the double
equals sign (==). The double equals sign doesn’t really mean “equals”.
It means “has a value of”.What we want to say is:
"If the variable called $kitten_image has a value of
1 then execute some code."
To complete the first line of the if statement we have another round bracket,
and a left curly bracket. Miss any of these out, and you'll probably get the
dreaded parse error!The code we want to execute, though, is the print statement, so that our kitten image will display. This goes inside of the if statement:
if ($kitten_image == 1) {
print ("<IMG SRC =images/kitten.jpg>");
}
You need the semi-colon at the end of the print statement.But if your if statement only runs to one line, you can just do this:
if ($kitten_image == 1) { print ("<IMG SRC = images/kitten.jpg>");
}
In other words, keep everything on one line. PHP doesn't care about your spaces,
so it's perfectly acceptable code. Not very readable, but acceptable!To make use of the church image, here's some new code to try:
<?PHP
$kitten_image = 0;
$church_image = 1;
$church_image = 1;
if ($kitten_image == 1) {
print ("<IMG SRC =images/kitten.jpg>");
}
if ($church_image == 1) {
print ("<IMG SRC =images/church.jpg>");
}
?>
Notice that the $kitten_image variable now has a value of 0 and that
$church_image is 1. The new if statement is just the same as the first.
When you run the script, however, the church image will display. That's because
of this line:
if ($kitten_image == 1) {
That says, "If the variable called $kitten_image has a value of 1 ...
". PHP doesn't bother reading the rest of the if statement, because $kitten_image
has a value of 0. It will jump down to our second if statement and test that:
if ($church_image == 1) {
Since the variable called $church_image does indeed have a value of
1, then the code inside of the if statement gets executed. That code prints
out the HTML for the church image:
print ("<IMG SRC =images/church.jpg>");
PHP If Statements
You saw in the last section that variables are storage areas for your text
and numbers. But the reason you are storing this information is so that you
can do something with them. If you have stored a username in a variable, for
example, you'll then need to check if this is a valid username. To help you
do the checking, something called Conditional Logic comes in very handy indeed.
In this section, we'll take a look at just what Conditional Logic is. In the
next section, we'll do some practical work.
You use Conditional Logic in your daily life all the time:
In between the two round brackets, you type the condition you want to test. In the example above, we're testing to see whether the variable called $User_Name has a value of "authentic":
We'll use the print statement to "print out" HTML code. As an example, take the following HTML code to display an image:
You can find these amongst the files you can download for this course, in the folder called images. (Go here to get the course files, if you haven't already.)
Copy the images folder to your www (root) directory. Then try the following script:
Conditional Logic
Conditional Logic is all about asking "What happens IF ... ". When you press a button labelled "Don't Press this Button - Under any circumstance!" you are using Conditional Logic. You are asking, "Well, what happens IF I do press the button?"You use Conditional Logic in your daily life all the time:
"If I turn the volume up on my stereo, will the neighbours
be pleased?"
"If spend all my money on a new pair of shoes, will it make me happy?"
"If I study this course, will it improve my web site?"
Conditional Logic uses the "IF" word a lot. For the most part, you
use Conditional Logic to test what is inside of a variable. You can then makes
decisions based on what is inside of the variable. As an example, think about
the username again. You might have a variable like this:"If spend all my money on a new pair of shoes, will it make me happy?"
"If I study this course, will it improve my web site?"
$User_Name = "My_Regular_Visitor";
The text "My_Regular_Visitor" will then be stored inside of
the variable called $User_Name. You would use some Conditional Logic
to test whether or not the variable $User_Name really does contain one
of your regular visitors. You want to ask:
"IF $User_Name is authentic, then let $User_Name have
access to the site."
In PHP, you use the "IF" word like this:
if ($User_Name == "authentic") {
//Code to let user access the site here;
}
Without any checking, the if statement looks like this:
if ( ) {
}
You can see it more clearly, here. To test a variable or condition, you start
with the word "if". You then have a pair of round brackets. You also
need some more brackets - curly ones. These are just to the right of the letter
"P" on your keyboard (Well, a UK keyboard, anyway). You need the left
curly bracket first { and then the right curly bracket } at the end of your
if statement. Get them the wrong way round, and PHP refuses to work. This will
get you an error:
if ($User_Name = = "authentic") }
//Code to Let user access the site here;
{
And so will this:
if ($User_Name == "authentic") {
//Code to Let user access the site here;
{
The first one has the curly brackets the wrong way round (should be left then
right), while the second one has two left curly brackets. In between the two round brackets, you type the condition you want to test. In the example above, we're testing to see whether the variable called $User_Name has a value of "authentic":
($User_Name = = "authentic")
Again, you'll get an error if you don't get your round brackets right! So the
syntax for the if statement is this:
if (Condition_or_Variable_to_test) {
//your code here;
}
In the next lesson, we'll use if statements to display an image on the page.
We'll use the print statement to "print out" HTML code. As an example, take the following HTML code to display an image:
<IMG SRC =church.jpg>
Just plain HTML. But you can put that code inside of the print statement:
print ("<IMG SRC =images/church.jpg>");
When you run the code, the image should display. Of course, you'll need an
image called church.jpg, and in a folder called images. You can find these amongst the files you can download for this course, in the folder called images. (Go here to get the course files, if you haven't already.)
Copy the images folder to your www (root) directory. Then try the following script:
<?PHP
print ("<IMG SRC =images/church.jpg>");
?>
Save your script to the same folder as the images folder (though NOT inside
the images folder). Now fire up your server, and give it a try. Hopefully, you'll
see the church image display, as in the following graphic:PHP Variables
A variable is just a storage area. You put things into your storage areas (variables)
so that you can use and manipulate them in your programmes. Things you'll want
to store are numbers and text.
If you're ok with the idea of variables, then you can move on. If not, think of them like this. Suppose you want to catalogue your clothing collection. You enlist two people to help you, a man and a woman. These two people are going to be your storage areas. They are going to hold things for you, while you tally up what you own. The man and the woman, then, are variables.
You count how many coats you have, and then give these to the man. You count how many shoes you have, and give these to the woman. Unfortunately, you have a bad memory. The question is, which one of your people (variables) holds the coats and which one holds the shoes? To help you remember, you can give your people names! You could call them something like this:
OK, so your people (variables) now have name. But it's no good just giving them a name. They are going to be doing some work for you, so you need to tell them what they will be doing. The man is going to be holding the coats. But we can specify how many coats he will be holding. If you have ten coats to give him, then you do the "telling" like this:
However, you're learning PHP, so there's something missing. Two things, actually. First, your people (variables) need a dollar sign at the beginning (people are like that). So it would be this:
So the man is holding ten coats. We can do the same thing with the other person (variable):
If you're ok with the idea of variables, then you can move on. If not, think of them like this. Suppose you want to catalogue your clothing collection. You enlist two people to help you, a man and a woman. These two people are going to be your storage areas. They are going to hold things for you, while you tally up what you own. The man and the woman, then, are variables.
You count how many coats you have, and then give these to the man. You count how many shoes you have, and give these to the woman. Unfortunately, you have a bad memory. The question is, which one of your people (variables) holds the coats and which one holds the shoes? To help you remember, you can give your people names! You could call them something like this:
mr_coats
mrs_shoes
But it's entirely up to you what names you give your people (variables). If
you like, they could be called this:mrs_shoes
man_coats
woman_shoes
Orwoman_shoes
HimCoats
HerShoes
But because your memory is bad, it's best to give them names that help you
remember what it is they are holding for you. (There are some things your people
balk at being called. You can't begin their names with an underscore (_), or
a number. But most other characters are fine.)HerShoes
OK, so your people (variables) now have name. But it's no good just giving them a name. They are going to be doing some work for you, so you need to tell them what they will be doing. The man is going to be holding the coats. But we can specify how many coats he will be holding. If you have ten coats to give him, then you do the "telling" like this:
mr_coats = 10
So, the variable name comes first, then an equals sign. After the equals sign,
you tell your variable what it will be doing. Holding the number 10, in our
case. (The equals sign, by the way, is not really an equals sign. It's called
an assignment operator. But don't worry about it, at this stage. Just remember
that you need the equals sign to store things in your variables.)However, you're learning PHP, so there's something missing. Two things, actually. First, your people (variables) need a dollar sign at the beginning (people are like that). So it would be this:
$mr_coats = 10
If you miss the dollar sign out, then your people will refuse to work! But
the other thing missing is something really picky and fussy - a semi-colon.
Lines of code in PHP need a semi-colon at the end:
$mr_coats = 10;
If you get any parse errors when you try to run your code, the first thing
to check is if you've missed the semi-colon off the end. It's very easy to do,
and can be frustrating. The next thing to check is if you've missed out a dollar
sign. But back to our people (variables).So the man is holding ten coats. We can do the same thing with the other person (variable):
$mrs_shoes = 25;
So, $mrs_shoes is holding a value of 25. If we then wanted to add up how many
items of clothes we have so far, we could set up a new variable (Note the dollar
sign at the begining of the new variable):
$total_clothes
We can then add up the coats and the shoes. You add up in PHP like this:
$total_clothes = $mr_coats + $mrs_shoes;
Remember, $mr_coats is holding a value of 10, and $mrs_shoes is holding a value
of 25. If you use a plus sign, PHP thinks you want to add up. So it will work
out the total for you. The answer will then get stored in our new variable,
the one we've called $total_clothes. You can also add up like this:
$total_clothes = 10 + 35;
Again, PHP will see the plus sign and add the two together for you. Of course,
you can add up more than two items:
$total_clothes = 10 + 35 + 7 + 38 + 1250;
But the idea is the same - PHP will see plus signs and then add things up.
The answer is then stored in your variable name, the one to the left of the
equals sign.What is PHP?
PHP (recursive acronym for PHP: Hypertext
Preprocessor) is a widely-used open source general-purpose
scripting language that is especially suited for web
development and can be embedded into HTML.
Nice, but what does that mean? An example:
Example #1 An introductory example
<!DOCTYPE HTML>
<html>
    <head>
        <title>Example</title>
    </head>
    <body>

        <?php
            echo "Hi, I'm a PHP script!";
        ?>
    </body>
</html>
Instead of lots of commands to output HTML (as seen in C or Perl),
PHP pages contain HTML with embedded code that does
"something" (in this case, output "Hi, I'm a PHP script!").
The PHP code is enclosed in special start and end processing
instructions
<?php and ?>
that allow you to jump into and out of "PHP mode."
What distinguishes PHP from something like client-side JavaScript
is that the code is executed on the server, generating HTML which
is then sent to the client. The client would receive
the results of running that script, but would not know
what the underlying code was. You can even configure your web server
to process all your HTML files with PHP, and then there's really no
way that users can tell what you have up your sleeve.
The best things in using PHP are that it is extremely simple
for a newcomer, but offers many advanced features for
a professional programmer. Don't be afraid reading the long
list of PHP's features. You can jump in, in a short time, and
start writing simple scripts in a few hours.
Although PHP's development is focused on server-side scripting,
you can do much more with it. Read on, and see more in the
What can PHP do? section,
or go right to the introductory
tutorial if you are only interested in web programming.
Subscribe to:
Posts (Atom)